
DSL SETUP INFORMATION
Most ADSL and VDSL modems are compatible with our service, But the setting must follow these basic settings:
Mode: PPPoA , VCI: 0, VPI:35, VC MUX
In some special cases you may need the modem in BRIDGED mode, but this requires that the device “BEHIND” the modem be holding the IP address.
EMAIL SETUP AND CONFIGURATION
If you are experiencing email issues or would like to setup email on your device please follow this link: https://help.emailsrvr.com
inbound server: secure.emailsrvr.com
inbound server port (IMAP): 993
outbound server: secure.emailsrvr.com
outbound server port (SMTP): 465
Outlook
Windows: Outlook 2016 (IMAP) Setup Guide:
- Click on the Start Menu (or press the Windows key) and then search for Control Panel
- After opening Control Panel, in the upper right-hand corner change View by: to Small Icons
- Click on Mail
- When the Mail Control Panel opens, select Show Profiles
- Select Add to add a new profile. Enter any name you wish and select OK
- Select Manual setup or additional server types. Click Next
- Select POP or IMAP and click Next
- In the Add New Account window, input the following information:Your Name: Your Name
Email Address: Your email address here
Account Type: IMAP
Incoming Mail Server: secure.emailsrvr.com
Outgoing Mail Server: secure.emailsrvr.comUser Name: Your email address here
Password: Your mailbox password
- Click on More Settings then click the Outgoing Server Tab
- Check the box for My outgoing server (SMTP) requires authentication
Check the button for Use same settings as my incoming mail server
- FIRST change Use the following type of encrypted connection to SSL for both the Incoming and Outgoing
Next, change the port numbers to match the image below.
- Click OK
- Click Next. Outlook will now attempt to send a test message using the settings we have just put in. If everything was entered correctly, the message will send out successfully.
- Congratulations! You have now setup Outlook to work with your Mailbox. Please wait 15 minutes before troubleshooting to allow for mail to download.
Don’t forget about your other devices! Click here to set up a computer, tablet, or phone.
Thunderbird or other Client
Other: Server Settings
If the device you’re trying to setup is requesting a username, you will find it below.
User Settings:
| Email Address | example@isunet.net |
| Username | example@isunet.net |
| Webmail | https://webmail.emailsrvr.com |
If the device you’re trying to setup is requesting an incoming or IMAP server, you should use the settings below. We strongly recommend using IMAP (SSL) whenever possible.
Inbound Servers:
| Type | Server Address | Port |
| POP Server (SSL) | secure.emailsrvr.com | 995 |
| IMAP Server (SSL) | secure.emailsrvr.com | 993 |
If the device you’re trying to setup is requesting an outgoing or SMTP server, you should use the settings below. We strongly recommend using SMTP (SSL) whenever possible.
Please note: Our SMTP servers require authentication. Which means you need to enter username and password to send through our network. We do not allow unauthenticated open relays to send through our servers. If your device does not support SMTP Authentication, you will not be able to use our settings. Please consult with the device manufacturer on whether your device supports SMTP authentication.
Outgoing Servers:
| Type | Server Address | Port |
| SMTP Server (SSL) | secure.emailsrvr.com | 465 |
| SMTP Server (Non-SSL) | smtp.emailsrvr.com | 25, 587, 8025, 2525 |
*For non-SSL SMTP, you can use any of the ports listed. Some networks block port 25, which is why we provide the alternate ports.
Just a reminder: If you need help setting up a computer (such as Outlook) or mobile device, go back to the dashboard home page where we have device specific instructions. These settings will not make sense unless you specifically need them.Don’t forget about your other devices! Click here to set up a computer, tablet, or phone.
Mac Mail
macOS: Apple Mail 10.0 (IMAP)
This article will assist you with setting up Apple Mail, using IMAP, for your Hosted Mailbox. This article assumes you have macOS 10.12 (Sierra) or higher. To check your version, click on the Apple icon on the top left corner and then About this Mac.
-
- Launch Mail. If Mail is not in your dock, Command (⌘) + Space Bar. Then type Mail in the Spotlight search. Press enter to launch the Mail application.
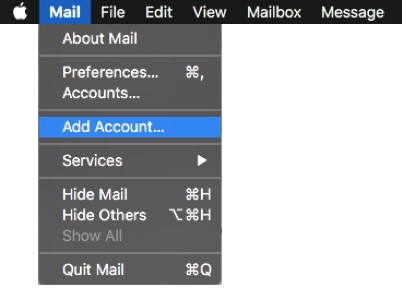
- Within Mail, click Mail on the top left. Then select Add Account
-
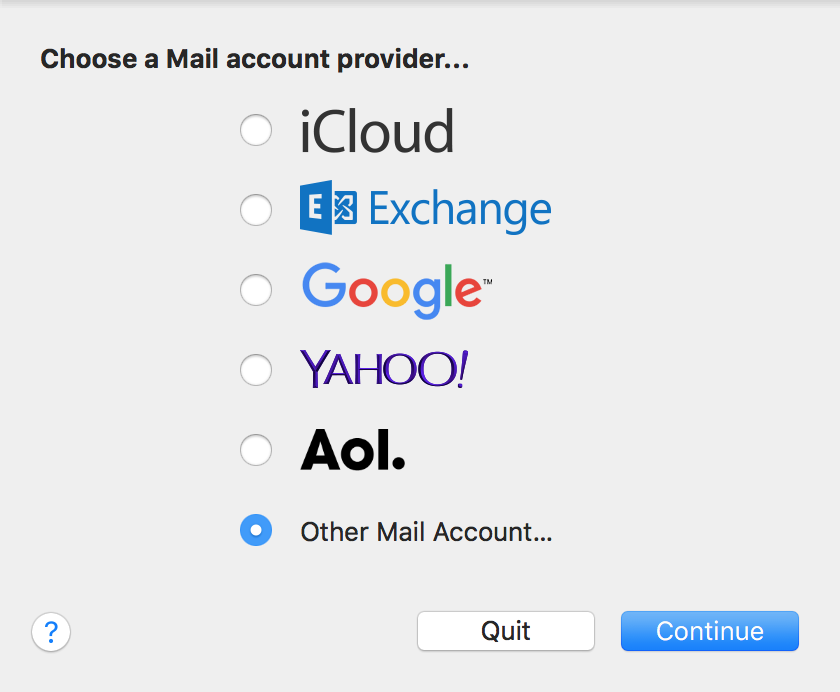
- In the pop-up window, select Other Mail Account
-
- In the next screen, enter the following information:Name: Enter your first and last name
Email Address: example@isunet.net
Password: Enter your mailbox password
- In the next screen, enter the following information:Name: Enter your first and last name
-
- Select Sign In.
- You will see an alert which says Unable to verify account name or password. Along with this alert, you will see more fields that require additional infoFill in the following details:
Email Address: example@isunet.net
User Name: your email address here (even though it says automatic, fill it in as shown)
Password: Your mailbox password
Account Type: IMAP
Incoming Mail Server: secure.emailsrvr.com
Outgoing Mail Server: secure.emailsrvr.com
-
- Click Sign In
- Select the desired syncing options. You can leave the defaults on
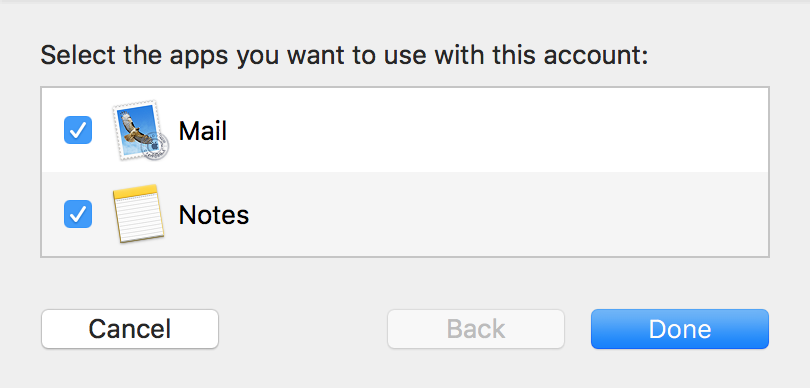
- Click Done
Next, we will configure your Mac to sync your various IMAP folders and prevent duplicate folders from showing up. We call this Folder Mapping; below are the steps to do so
-
- Within Mail, click Mail on the top left. Then select Preferences

-
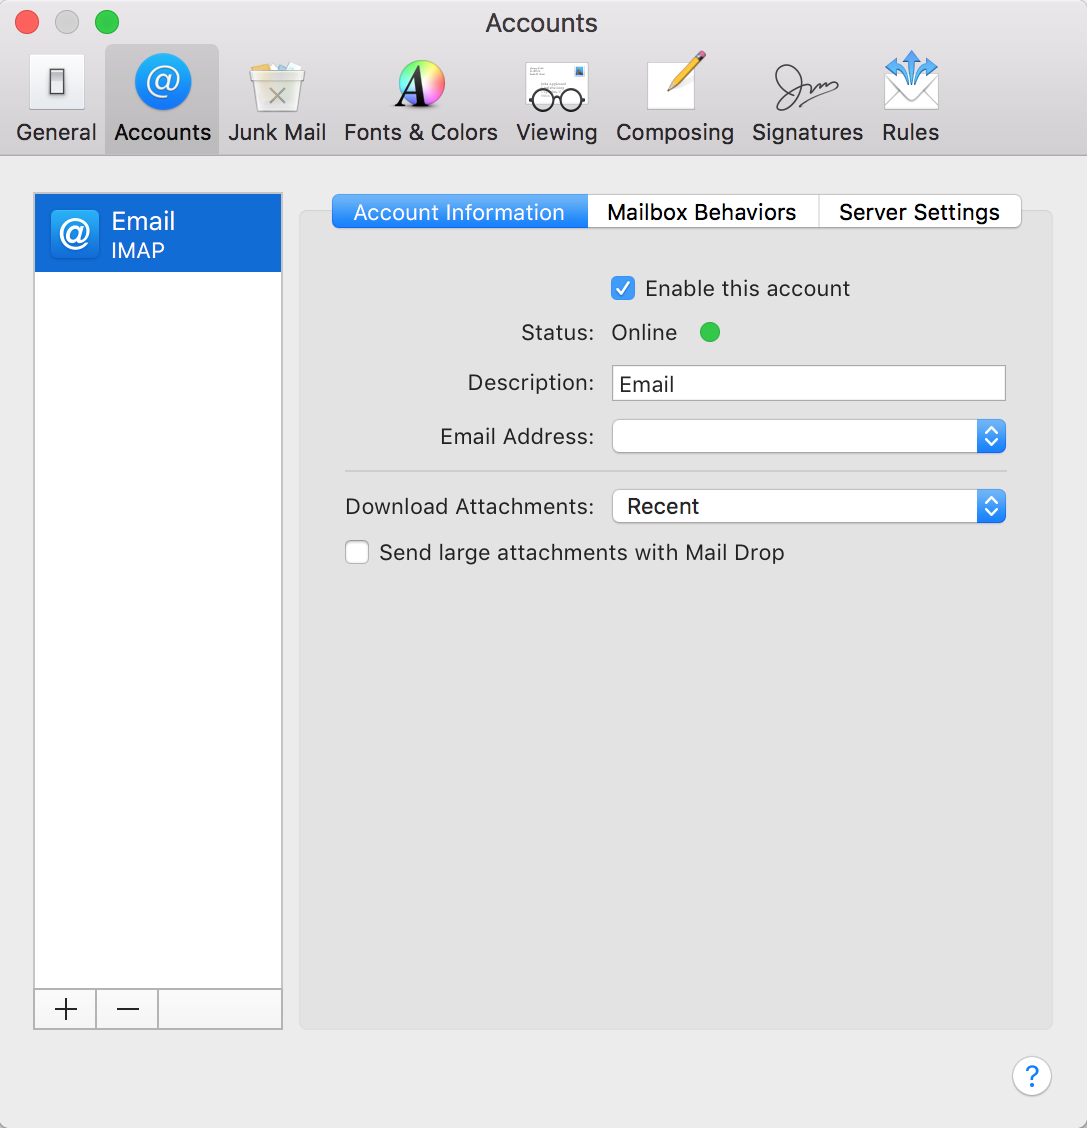
- Select the Accounts tab at the top of the window, then select your IMAP email account from the left pane
-
- Select the Mailbox Behaviors tab
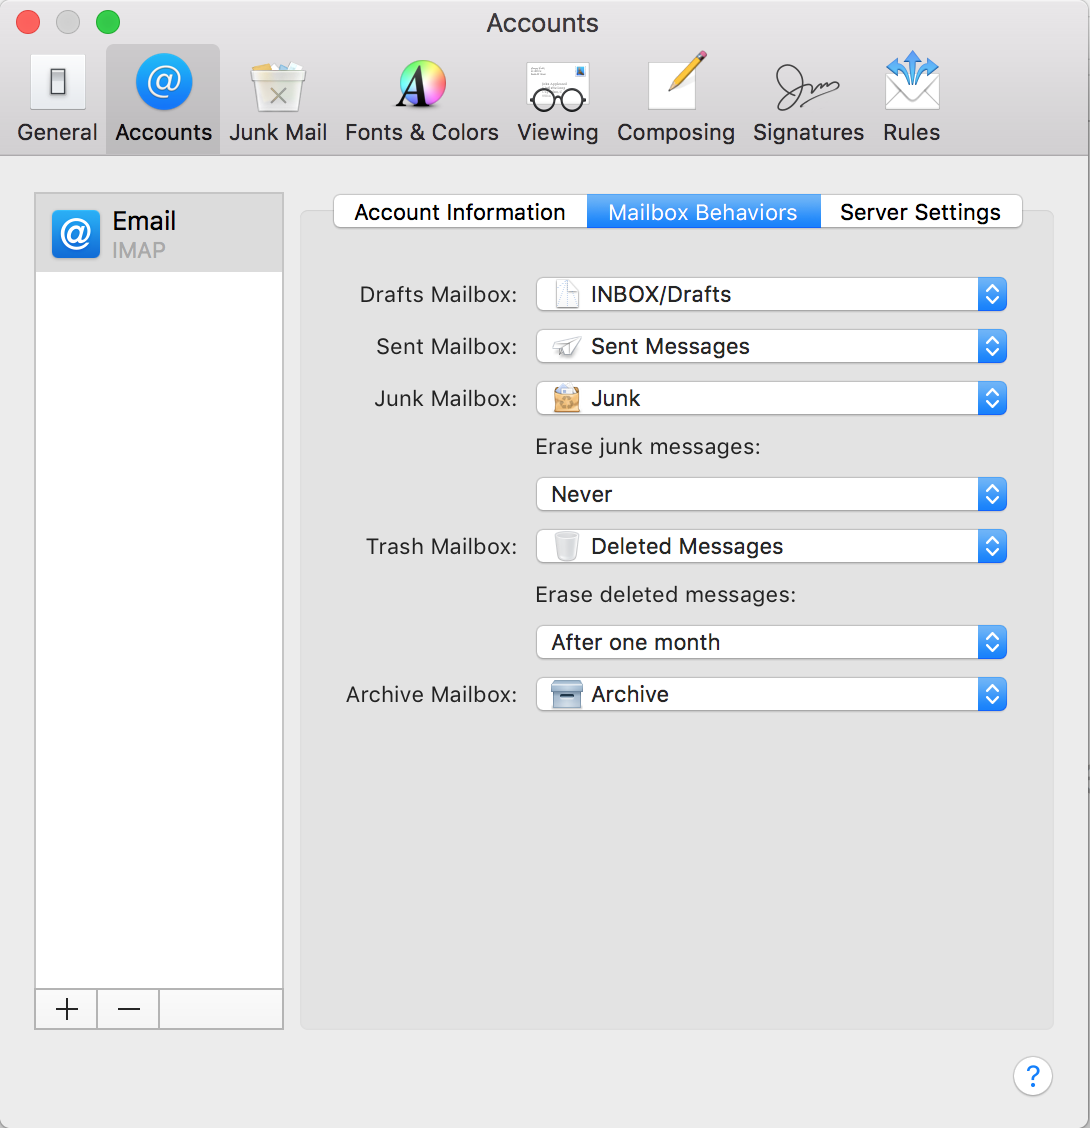
-
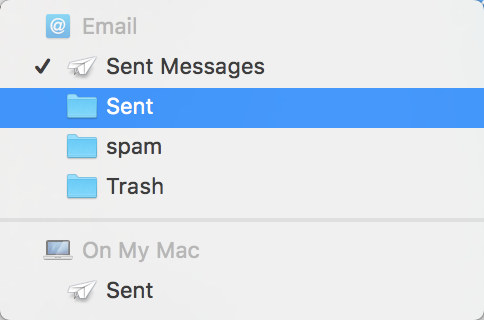
- Click the Sent Mailbox dropdown and select the folder Sent that’s listed under your email address (not the folder listed under “On My Mac“)
-
- Click the Junk Mailbox dropdown and select the folder spam that’s listed under your email address (not the folder listed under On My Mac)

-
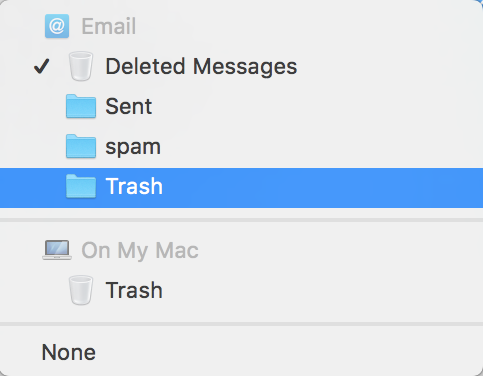
- Click the Trash Mailbox dropdown and select the folder Trash that’s listed under your email address (not the folder listed under On My Mac)
Lastly, we will make sure our SMTP server settings are correct, as Apple Mail tends to change them automatically during setup
-
- While still on the Accounts screen, click on the Server Settings tab, next to Mailbox Behaviors
- Under Outgoing Mail Server SMTP, Uncheck the automatically manage connection settings. (Make sure you do it under SMTP, and not IMAP, as they have the same checkbox) This will unlock a new area below
- Go ahead and change the Port Number to 465
- Click the Save button on the bottom right
- Close the Accounts window
- Finally, go back to the Mail app. Your email should begin downloading shortly, if it hasn’t already. Please wait 15 minutes for mail to download before troubleshooting any issues
Don’t forget about your other devices! Click here to set up a computer, tablet, or phone.
Was this article helpful?